Pot Roast
- Tracy Scheckel
- Mar 10
- 5 min read


Pot roast is one of those traditional comfort foods that just make everything feel warm and cozy. And, given the winter we've had this year, I would be remiss not to share this ever so simple recipe.

When I was a kid, my mom had this really heavy anodized aluminum dutch oven that she would cook her pot roast in. it's not one of the items she handed sown, so for years I either used one of those speckled oval roasters or a cast iron deep fryer (once I could afford to purchase one).
The deep fryer did the job but it was barely deep enough to fit the roast and the vegetables and still get the lid to sit properly on top. here's where I head into a long story about the dutch oven I acquired; feel free to jump to the recipe.
My mother-in-law, really my second mom, had a beach house at the Jersey shore and one day when I was in her garage looking for something or other, I find this rusty, dusty cast iron pot with a swing-up handle like you'd see on a pot hanging over a camp fire. I brought it up to the kitchen and asked about it. I
f I recall correctly, mom didn't really recognize it (it was buried in a heap of stuff under the stairs up to the house) and she thought it likely had either been there since they bought the house or someone in the family discarded it there. Anyway, she told me I could have it and that you can restore cast iron pretty easily.
Rabbit Hole Warning or Bonus:
How to re-season your cast iron pots and pans
I brought the pot home and employed some Naval Jelly to de-rust it. There are some rust removal products on the market designed for cast iron cookware, but Naval Jelly works the best AS LONG AS you do a really good job to remove any trace of the stuff once the rust is gone, and here's why. By the way, this is the very cast iron pot that I now make my pineapple upside down cake in.
In the de-rusting process, the Naval Jelly leaves behind a residue of phosphoric acid and that's not something you want to ingest or have infused in your cooking. So, here are the steps to make sure you have eliminated the phosphoric acid with the rust.
With a stiff bristle brush or steel wool and a strong dish soap like Dawn, scrub and rinse the pot until there is no sign of any solid residue remaining.
Immediately, dry the pan with clean paper towel rubbing for 30 to 60 seconds. If the paper towel has any sooty residue remaining, return the pot to the sink and sprinkle some baking soda and re-scrub the pot, rinse and repeat the drying process. It's important to get the pot completely dry so that you don't have what's called flash rusting.
As soon as the pot is clean and dry, use a clean paper towel or pastry brush to give it a coat of cooking oil. Use an oil that has a higher smoke point like avocado or canola.
To complete the re-seasoning process, heat your oven to between 450 and 500 degrees and bake the oiled pot for one hour.
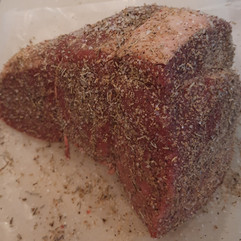
Now back to the pot roast.... I generally use a bottom round or eye round for my pot roast, but many like a more marbled cut like chuck or brisket. While they are more forgiving and less likely to fry out,, they have a stringier texture that I am not fond of. It does take some finesse to prepare the bottom and eye rounds, but it's not rocket science and a meat thermometer will take all of the need for finesses right out of the picture.
THE RECIPE
1.5 - 3 lb beef roast
1 T each of salt, pepper, garlic powder, and onion powder
1-2 large onion cut into 1/2" chunks
1 or 2 carrots cut into 1/4" dice
1-2 large celery stalks cut into 1/4" dice
One 10 OZ package of mushrooms cut into chunks.
Oil to coat the pan for browning
1C beef broth or water
1T Worcestershire sauce
1T soy sauce
1T balsamic vinegar
1-2T dry red wine
4T butter
2-4T flour
1 can beef consomme
Prepping the Ingredients
Allow your beef to sit out of the fridge until its about room temperature
While the meat is setting, cut up the vegetables
Combine the salt, pepper, onion and garlic powders into a small bowl.
Dry the meat with paper towel
Preheat your oven to 275 degrees for a nice slow roast
When the meat is at room temp, rub it down with the seasoning mix patting the mixture on all sides.


Searing
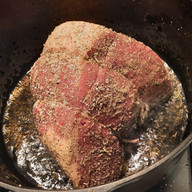
With your exhaust fan roaring, set the dutch over on a burner on high and add oil to cover the bottom of the pan.
When the oil starts to shimmer a bit, you're ready for searing.
Using 2 meat forks of something that gives you some control to position the meat, set it into the pan and let the first side brown, after a minute or 2, carefully reposition the meat to sear the next side
Repeat until each side of the meat has been seared.


Roasting
Remove the pot from the burner and position the roast in the center
Distribute the vegetable around the meat, toss in any of the spice rub that's remaining and add a cup of beef broth or water.
Insert a meat thermometer into the roast and set it to your desired temperature. I set it to 130 degrees on the medium side of rare. I do this because when reheating or adding hot gravy, I don't want my meat to get cooked beyond medium or 140 degrees.
Cover the pan and place it in the oven until the meat reaches temperature.
When the roast is at your desired temperature, remove it to a platter and cover it tightly.


Finishing the Vegetables
At this point, the vegetables may need more cooking and you can either cover the pot and crank up the oven for a bit or finish them to your desired tenderness on top of the stove.
I like to finish them on the stove and lower the oven to as low as it goes so I can keep the meat and veggies warm while making the gravy.
Once the vegetables are cooked to your taste, with a slotted spoon, remove them to a bowl (you want all the bits, pieces, and juices left in the pot), cover, and set both the vegetables and beef into a super low oven to keep them warm while you make the gravy.
Making the Gravy
In a small bowl or measuring cup, combine, the soy, Worcestershire, balsamic and wine and set aside.
Carefully place the dutch oven containing all the drippings and residue from the roast and veggies a low burner.
Gently scrape anything that may be stuck and add the butter.
When the butter is melted, add the flour (you're making a roux) and whisk until it's combined with no lumps.
Continue stirring and whisking until the roux begins to turn a deep golden brown
Pour the mixture of soy, vinegar wine etc into the roux and stir to combine and thicken
Add the can of consomme and whisk to ensure that there are no limps.
Bring the gravy to a slow simmer and stir frequently to avoid in sticking or burning while it's thickening.
Serve Away!

Once the gravy is thickened to your liking, slice the meat and serve.
I like a slather of horseradish under my gravy and for this post I served some pouting and steamed spinach on the side.


